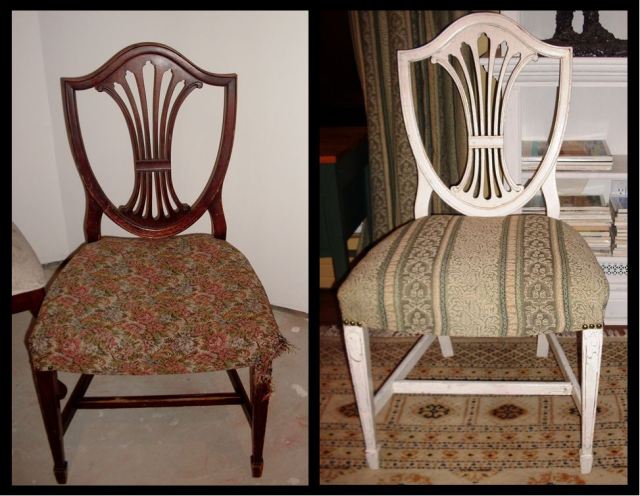
You don’t always need to buy new things to decorate well. This project can give new life to an old chair, or stretch your Craigslist dollars to a whole new level of decorating. It takes patience and time, but the result is pure luxury.
I like this look because it combines the luxury of gold leaf with the insouciance of shabby chic!
Look around the house for existing scraps and spare materials before you start. I used a spare chair from a set purchased from Craigslist for a different project, and a scrap piece of fabric from drapes. This worked because with the chair and drapes matching, the room ends up with a custom look. I also had lots of existing bits of leftover paint to pick from.
This project has three phases, which may or may not be necessary for the chair you restore, and this post covers only Phase 1: new paint finish on wooden part of chair. Subsequent posts will deal with:
Phase 2: rebuilding of support in seat area, if necessary, and
Phase 3: applying new fabric and trims
Phase 1: Paint Finish
What you need
-classic wood chair, in need of rehab
-awl or other tool for removing staples from wood
-pliers
-TSP (a cleaner for prepping surfaces to paint)
-rag
-latex or other thin, rubbery glove (paint section of hardware store)
-wood filler
-sandpaper
-red stain (shade should go with your other reds)
-sealer (read this post over, before choosing)
-gold leaf adhesive
-gold leaf sheets
-burnishing brush
-crackle medium
-paint in main colour you wish to see
-1-inch wide paintbrush with tapered and angled tip
-solvent (if using oil based paint materials)
-large plastic sheet to protect floor
Paint Colour: I used a paint in the trim colour of most of my home’s interior (Mayonnaise, by Benjamin Moore), which works well because (a) I had a selection of leftovers and therefore saved money, (b) you will enjoy your chair for longer if it is in a flexible, easy-to-co-ordinate colour and (c) it will co-ordinate with your house.
In 2011, paint projects present some challenges that did not used to crop up. This is because the sale of oil-based paint has effectively been banned, and acrylic latex or water-based paints, which are much less of a health hazard, nonetheless do not adhere as easily to many surfaces. Although this posed challenges, the project worked out well. Since I did this project, a new paint, “waterborne alkyd” is on the market and is supposed to be the most durable for furniture projects.
Do this project one small step at a time and it will fit into your busy life and not be overwhelming.
Step 1: Remove fabric and padding from chair, using an awl or other tool for prying out staples and taking care not to let them fly into your eyes (eye protection is recommended). Try to keep fabric intact for use as a pattern in phase 3 of the project. Also remove padding very carefully if you are planning to re-use it.
Tips: Pull stubborn staples with pliers once loosened. Avoid grinding up the wood of the chair, so that your staples will grip the wood when you re-apply decorator fabric.

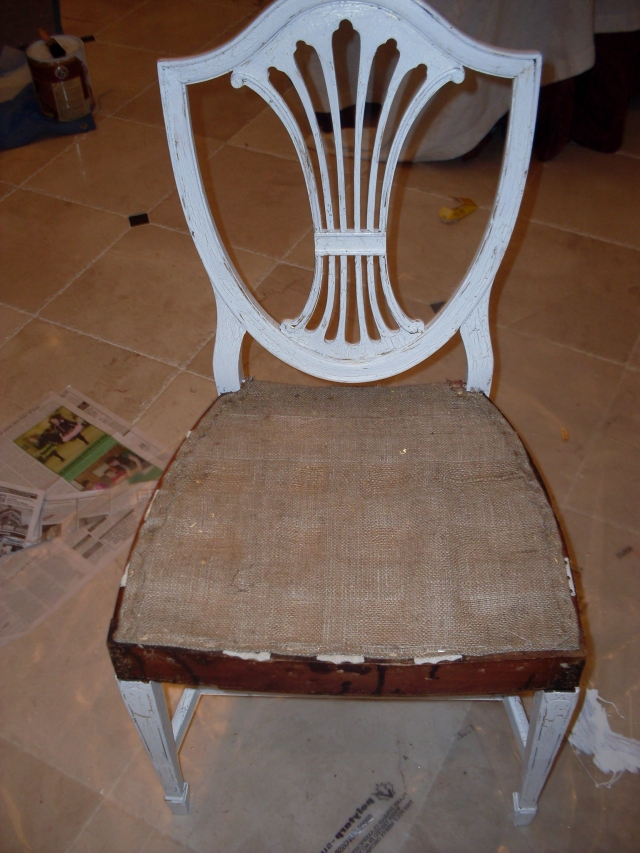
Pulling gently at fabric may lift out some of the staples so that you don’t have to pry every single one. Note the webbed fabric seat construction revealed
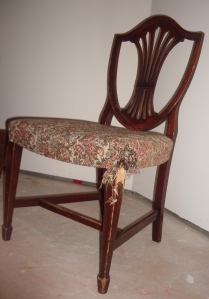
If (as in my son’s chair project) your fabric and padding are attached to a wooden seat support, just take out the whole thing and set it aside. However, if (as with my project) the underlying seat structure is a webbing of some sort, you may determine whether or not it is salvageable. If it is salvageable, then you are very lucky! You will be able to skip phase 2. My chairs were quite old and had, apparently, been reupholstered at least twice before and reconstructed incorrectly, using an awful thin metal webbing which sagged, creaked evilly like a haunted thing and provided very little support at all! So, if necessary, remove any such structure so that now you just have the beautiful wooden frame of your chair.
Step 2: TSP Spread out floor protection and put your chair in the middle of it. Mix up TSP in very warm water according to package directions, put protective glove on your scrubbing hand, and wash your chair vigorously with TSP mixture to remove all oily buildup from the existing finish and any polishes previously used on your chair. (You don’t have to wash the parts of the chair that will be covered with upholstery when it is put back together.) The mixture will quickly turn a dirty brown the colour of your chair’s finish. Once you have scrubbed every inch of the part to be painted, quickly refill your pail with clean water and rinse off the TSP completely. Wipe up plastic and/or floor and allow chair to dry.
Fill cracks, dents and other damaged areas of chair with the wood filler and allow to dry again.
Step 3 Sand all surfaces to be painted to increase adhesion and smooth out the wood filler. I recommend an 80 grit sandpaper for the first sanding of this type of project (100 is okay), and you must make sure you get into all the nooks and crannies of the chair’s details. This step is important so be patient and thorough, tearing the paper to a size that works for you and bending or folding it so that you can scrape into crevices. Sand with the grain of the wood.
A paper “SARS mask” is recommended to protect your health during this step and all other steps involving dust or fine particles.
Use a very clean cloth to wipe all the sanding dust off the chair. Now you are ready to paint!
Step 4: Red Stain Traditional gold leafing was applied over a red base. Gold leafing  crumbles somewhat during the application process, allowing the red to show through. This gives your project a real warmth and, although some may think this step unnecessary given that crackled paint will cover most of the gold leafing, it does add a layer of character which I personally prefer. I used a penetrating stain bought in a very small can for this project. It approximates the colour of the dining room walls in the room next to where the chair will be.
Open windows and ventilate your work area. Mix up the stain well and apply it to the chair so that it sinks right in, brushing with the wood grain and going back over any drips. Make sure you apply enough to really see the red colour on the wood, yet not an excess. If using an oil-based or mineral spirits-based stain, you will need to clean up with a solvent.
Be careful that you clean all colour completely out of this paintbrush or it will ruin the following steps of the project! Use a new paintbrush if you prefer.
Step 5 The way gold leaf adheres to furniture is with a sticky product called “sizing”. Special sizing designed for gold leafing is sold in craft stores. Paint the sizing onto all surfaces to be leafed. The leaf will not adhere to any spots that you miss. If you like a worn look with red stain showing through in the cracks and crevices, you can be a little careless in those areas, but you will want mainly gold, not red, to show through your crackle in the final product.
Brush out runs and drips. If your stain is oil or mineral spirit based, your water-based sizing may clench up and recede into a spotty partial coverage when you apply it, in spite of the manufacturer’s intentions that it cover anything. Not to worry–just brush it out again. Keep going back over the sizing and smoothing it out as it begins to dry, and get the best coverage possible. Not ideal, but that’s what we have to work with and the project turns out in the end, as you can see above. I have done this several times with great results!
Once again, clean your brush out thoroughly. It is unlikely that you will find an oil- or solvent-based sizing in Canada, so you can probably clean up with soap and water.
Allow to dry for the time recommended on the sizing package.
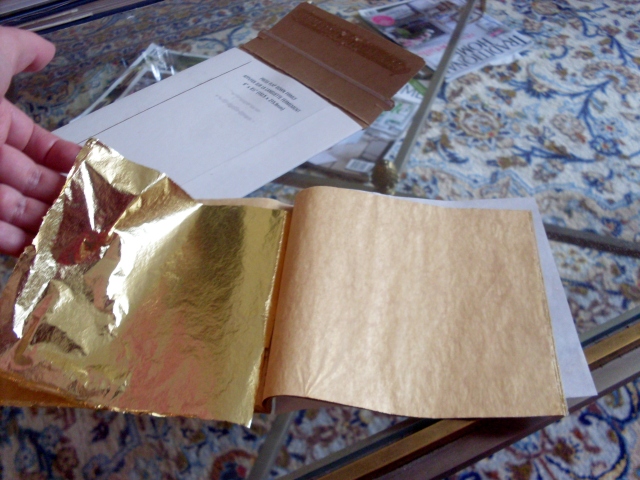
Step 6: The GLAMOROUS part! Open up gold leaf gently and handle carefully as it is very delicate and will fall apart easily. Don’t worry though; some crumbling is to be expected.
There are many types of gold leaf, and I like to visit Curry’s Art Stores, a chain in Southern Ontario, to choose from their gorgeous selection. Although real gold leaf is available, you can imagine the difference in cost! I used an imitation composite gold leaf. Each type of leaf is in a different colour, and I do not recommend anything multicoloured for this project. To go with the classic English style of my chair and my house, I chose the warm tones of German gold leaf paper.
Start on the largest, flattest surfaces to be covered and apply leafing by gently and smoothly touching it onto the sized surface. Bend and wrap it around all corners, curves and narrow sections of the chair. Pick up significant-sized bits that fall off and apply them tosmaller areas of chair. You will have to smooth it in between the back detail on a typical traditional chair, and it is easier to do this with the edge of a piece of leafing than with little bits that fall off.
The leaf will crack and crumble as you apply it, and you will see bits of red stain through it. Keep adding smaller pieces of leaf over the larger broken areas until you have a coverage that you like.
Lightly run your finger over raised pieces of leaf to make them adhere to the sizing. In the event that you cannot get leafing to stick to a particular spot, don’t worry. You can add a little more sizing to this area, as long as you completely recover the sizing with leaf.
Continue applying leaf until the chair is covered with a fairly smooth but somewhat cracked coat of gold. Wow! Glitzy!
When you are satisfied, grab your burnishing brush and pat the tips of it repeatedly into the grooves and detailing of the chair, pouncing and brushing the entire surface of the chair to smooth the leafing onto the wood and knock off excess bits of leaf.
There should be very little wasted leafing on the floor when you are done.
Your significant other (or teenaged kids) may now express horror at the obnoxious look of your creation, so reassure them that you are not moving to Hollywood next, but rather moving on to steps 7-9.
Step 7: Seal At this stage, I feel the delicate gold leaf finish needs a clear, protective sealer. You will need a clear urethane intended for furniture. I used up a Benjamin Moore product that I had, used up, and could not replace. I then bought a product called “Wood-Shield Clear Coat Acrylic Polyurethane Wood Finish, in a “satin” gloss level, which I was happy with.
You will have to use an acrylic/latex/water-based sealer like this for two reasons: 1–That is probably all you are allowed to buy (in Canada) anymore. 2–Any oil/solvent/mineral spirit based “varathane” will yellow and discolour.
Also, you want to be able to use many coats of the same sealer over the final paint colour. Again, a non-water based sealer will change your paint colour.
Problem: The newest water-based acrylic urethanes and paints are meant to go over any other finish including an oil base. However, in practice, they still do not go on as well as an oil-based one would.
So, brush on one coat, but as in step 5, you may find certain areas where the sealer recedes on the gold leaf, and you will have to go around re-brushing it out to make sure it ends up somewhat smooth. Do your best, but don’t worry if it doesn’t look perfect because there are lots more layers to go!
It will go on whitish in colour, and dry clear. Clean trusty brush; let project dry.
Step 8 Next, apply the “crackle medium”. You get to be creative here. If you like small, subtle crackles, you just need a thin layer. For bigger, more dramatic crackling, use a thicker layer. If you want drama, like me (and also since you do want to see some of the gold you so painstakingly applied), go ahead and slather on two coats! Just do make sure that you brush it out smooth, and don’t let drips or puddles occur.
I used the Behr crackle medium sold at Home Depot stores which, again, I had lying about the house (don’t ask, it is a compulsion). I have seen lots of criticism of this product online; however, my projects with it have all turned out very satisfactorily.
Let dry the length of time presccribed on the can; clean brush really well.
Step 9 Apply Final Paint Colour but read this step over carefully FIRST.
Get all set up with your paint. You just need a low-gloss water-based paint. I used Benjamin Moore satin acrylic latex interior paint in a warm cream colour called “Mayonnaise”, which I love. Stir it up well and make sure it is not old and hardened. Thin slightly if necessary.
Do not start yet, but note: The moisture from the paint re-wetting the crackle medium will cause the medium to shrink into crackle formations.
***This is the trickiest part of the project. Stop and think through your plan! Before you brush one stroke, remember that you cannot roll or brush back and forth over a crackle finish once it is applied. Do not forget this in a moment of distraction. In fact, send teenagers, pets and significant others away for this part.***
Scared? Don’t be–crackle is a distressed finish and, as such, imperfect.
I recommend starting with the chair upside down and beginning on the legs and supports, then turning it upright by holding the areas that you will be putting the upholstery on, once you have worked your way up the long back leg sections that meet the top of the chair.
Start and stop each section of chair at a turn or corner so as not to have strokes where you can see the overlap. Where there are surfaces (such as on the back of my chair) that face each other and are hard to reach, stroke down the inside of the surface and a surface facing you, such as the front of the chair back, using one stroke in which the bristles attempt to cover both surfaces.
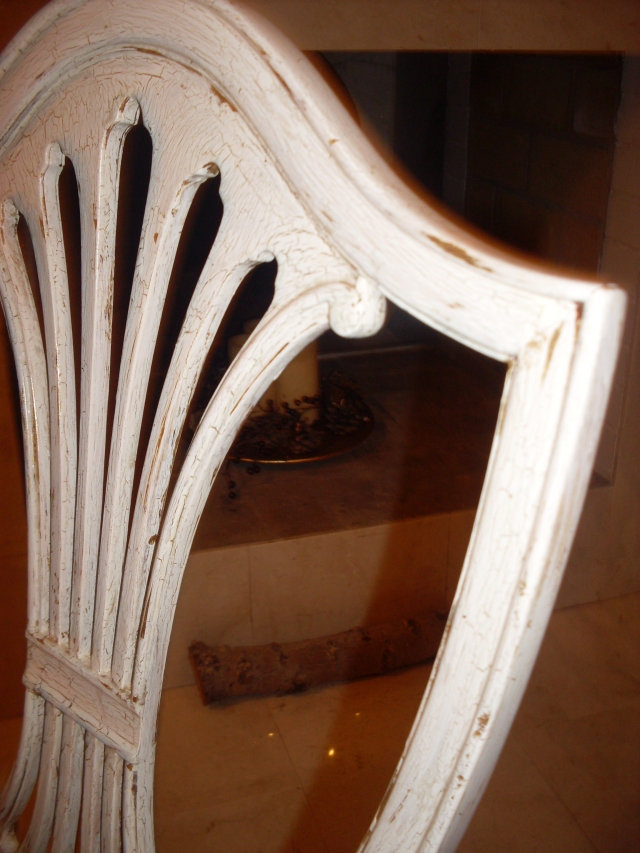
Make sure you have enough paint on your brush to make as long a stroke as possible without dripping or going on too thick, and begin in the largest, most visible areas. In spite of my dire warning above, it is okay to smooth an area that is too thick, or lightly dab an area you didn’t cover well. You can take two strokes side by side that overlap faintly. Once the paint has been on the crackle for a few seconds, you will see it begin to form cracks, and after that, any more paint applied will cover up the crackle.
Your coverage need not be absolutely complete, either, as you do want to see plenty of gold. Don’t be picky about filling in small gaps in the paint job.
Stop sooner rather than later, and let dry while again cleaning your brush.
Give it a day or so to dry.
Step 10: Carefully-Planned Process of Sealing! Leave the chair upright and, while admiring your beautiful handiwork apply a smooth coat of the clear, non-yellowing sealer, starting at the top. Leave any parts that you can’t reach on the underside of the chair for the third session of sealer application.
These perplexing instructions are intended to avoid accidental damage to the still-vulnerable finish, especially if you used a light colour.
Allow sealer to dry. Using fine sandpaper (220 grit or thereabouts), sand out only unsightly lumps or problem areas. Be very careful that the sanding does not mark, discolour or take off too much paint. You are not sanding for adhesion in this case.
(A little note: there is a lot of debate about how necessary it is to sand in between layers of clear-coat for proper adhesion between layers. In the case of a latex, note that wetting a coat that you applied within the last few days, or even weeks, will soften up the existing layer just enough that the top layer will, in fact, bond with it. These are water-soluble products It is not as though you are applying it to an impermeable surface with different “ingredients”.)
Apply a second coat of sealer to the same areas of the chair; let dry.
Turn chair over and seal the areas you could not reach with it the other way up. Let dry, sand lumps, reapply.
Continue applying sealer (sanding only bad lumps and giving lots of time to dry in between; see product label) until you have achieved a satisfactory soft glow, and the paint finish is fully covered by a thick, protective layer. I recommend at least 5 or 6 coats of sealer.
On the back of a chair like mine, pictured above, you do not have to do more than one or two layers of clear coat in between the back vertical details. The chair does not need as much protection in those areas, and if you keep layering sealer there is a danger of dripping and puddling and having a thick, unattractive buildup in there.
Well? Pat yourself on the back when you have finished the last layer, and really let this thing dry. After this, you will only want to work with it on a very soft, grit-free surface like a clean carpet, to avoid any damage while you are putting the soft finishes on it.
You can move on to phase 2 or 3 (depending on your chair) which I will detail in a separate, upcoming post.
********************
To make sure you get the rest of the steps for this project in your inbox when published, scroll up and click on “follow” in the right-hand margin.







NICE! This is waaay over my head but what a difference! Great job! Woman of many talents!
Thank you!
Thank you for stopping by La Maison! I see you are also very crafty! Great projects!
Thank you–and thanks for checking mine out.
Oh my this is just too good to be true! I’m helping my mom re-decorate her den and this is just the PERFECT project for a Craigslist find we happen to have! Very glad we found one another today!!
I am so glad to hear that! I actually couldn’t find any real help online when I first tried to plan the details of these projects, so I thought this should help someone. I’d love to hear how it goes.
I love that crackle look! Great job!
Thanks!
Great job!
Thanks!
Pingback: First Place Furniture | patinaandcompany